Table of Contents
ToggleLarge windows can make or break a living room’s atmosphere. They flood the space with natural light, frame outdoor views, and create an open feel that smaller windows simply can’t deliver. But they also present unique challenges, glare control, privacy concerns, and the sheer task of dressing an expansive glass surface without overwhelming the room. Whether you’re working with floor-to-ceiling panes, picture windows, or bay installations, the right approach to your living room window design can amplify your space’s strengths while solving practical problems. Here’s how to tackle large living room windows with treatments and layouts that work as hard as they look good.
Key Takeaways
- Large living room windows flood spaces with natural light and anchor furniture arrangements, but require proper glass specifications like low-E coating and double-pane construction to manage heat gain and energy efficiency.
- Floor-to-ceiling curtains mounted 2–4 inches below the ceiling with 1.5–2.5 times the rod width in fabric creates an intentional, softened look that emphasizes ceiling height.
- Layered window treatments combining solar shades, cellular blinds, or sheers with heavy drapes give you flexible control over light, privacy, and insulation throughout the day and seasons.
- Top-down/bottom-up shades and frosted lower panes solve privacy concerns while preserving natural light without turning the room into a cave.
- Strategic furniture placement that orients seating toward the view, keeps upholstered pieces 12–18 inches from glass, and uses low-profile tables maximizes large window design impact.
- Minimalist approaches with recessed motorized shades, window film, or no treatment work best when the window itself is a finished architectural element with clean lines and quality trim.
Why Large Windows Are a Game-Changer for Living Rooms
Large windows introduce natural light on a scale that changes how a room functions. Compared to standard double-hung or casement windows (typically 24″–36″ wide), expansive glazing, think 60″ wide or more, often spanning from near-floor to ceiling, delivers three to five times the daylight penetration. That reduces reliance on overhead fixtures during daytime hours, cutting energy use and making spaces feel bigger.
From a design standpoint, large window ideas for living room layouts also anchor furniture arrangements. A picture window or a sliding glass door wall becomes the focal point, pulling seating toward the view. This works especially well in open-concept homes where the window wall defines the living zone without physical barriers.
But there’s a trade-off. Expansive glass increases heat gain in summer and heat loss in winter unless it’s low-E coated (a microscopic metallic layer that reflects infrared light). Single-pane or older double-pane units can spike HVAC costs. If you’re planning a window replacement or addition, specify double- or triple-pane low-E glass and check the U-factor, 0.30 or lower is the target for most climates. New construction or major remodels typically require compliance with the International Residential Code (IRC) for egress and energy performance, so confirm local requirements before ordering custom sizes.
Large windows also expose more interior square footage to UV rays, which fade upholstery, flooring, and artwork over time. UV-blocking window film or treatments with UV-resistant fabrics are practical fixes if replacement glass isn’t in the budget.
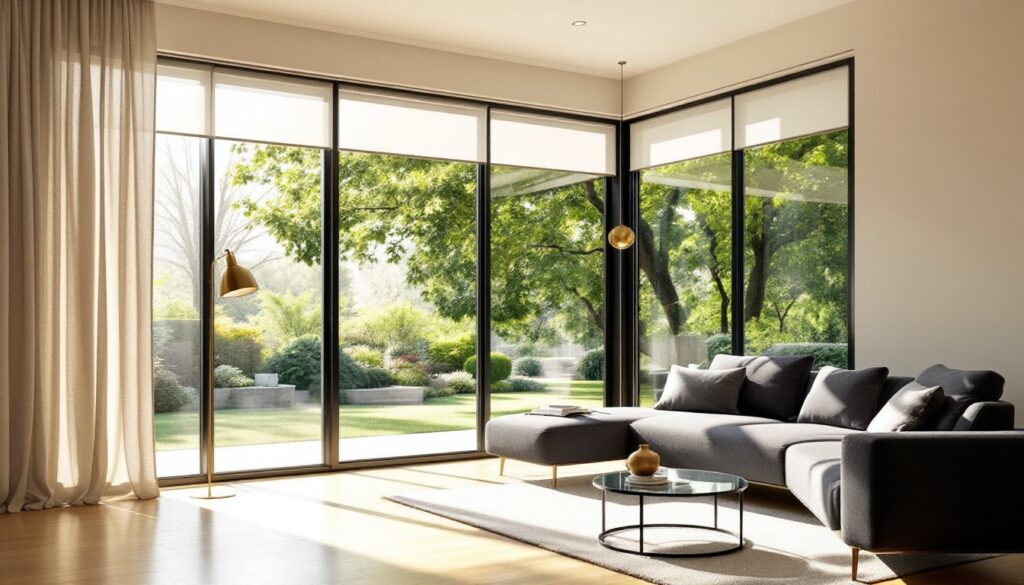
Floor-to-Ceiling Curtains and Drapes
Hanging curtains from ceiling to floor is the fastest way to make a large window feel intentional instead of awkward. The vertical line draws the eye up, emphasizing ceiling height and adding softness to hard-edged glass.
Hardware placement matters. Mount curtain rods 2″–4″ below the ceiling line (or directly on the ceiling with a track system) rather than at the window frame. Extend the rod 8″–12″ beyond each side of the window so panels can stack off the glass when open, maximizing light and view. For a 72″ wide window, plan for a rod spanning at least 88″–96″.
Panel width is equally critical. Measure the rod length and multiply by 1.5–2.5 for gathered fullness. A 96″ rod needs 144″–240″ of total fabric width across all panels. Skimping here makes curtains look flat and cheap. Ready-made panels come in 50″–54″ widths: custom workrooms can seam wider cuts for seamless coverage.
Fabric weight: Linen, cotton velvet, and medium-weight polyester blends handle large panels without sagging. Sheer fabrics work for diffusing light but offer zero privacy at night unless layered with opaque panels or shades. For south- or west-facing windows, consider blackout-lined drapes, a polyester or foam layer bonded to the back fabric blocks 95%+ of light and significantly reduces heat transfer.
Installation tip: Longer panels need more support. Use heavy-duty brackets rated for 20+ lbs and add a center support bracket for rods over 72″ to prevent bowing. If mounting on drywall, anchor into studs or use toggle bolts rated for the combined weight of rod and fabric.
Layered Window Treatments for Versatility
Layering gives you control over light, privacy, and insulation, three variables that shift throughout the day and seasons. The classic combo pairs sheer panels or solar shades closest to the glass with heavier drapes on the outermost layer.
Inside layer options:
• Solar shades (roller style): Woven mesh fabric that filters UV and glare while preserving outward views. Openness factor ranges from 1% (opaque during day, some privacy at night) to 10% (maximum view, minimal privacy). Motorized versions with remote or app control run $250–$600 per window depending on size and brand, but they’re worth it for hard-to-reach installations.
• Cellular (honeycomb) shades: Air pockets in the pleated fabric add R-value of 2–5, cutting heat loss by 25%–40% in winter. Cordless or top-down/bottom-up lifts work well for large windows where manual cords become unwieldy.
• Sheer curtains: Lightweight polyester or linen blends diffuse harsh midday sun without blocking the view entirely. Pair with blackout drapes for day/night flexibility.
Outer layer: Heavy drapes or lined curtains slide closed for privacy, light control during movies or sleeping hours, and an extra thermal barrier on cold nights. Install these on the ceiling-mounted rod: mount shades or sheers inside the window frame or on a separate rod 1″–2″ closer to the glass.
Layering does add bulk, allow 4″–6″ of depth from wall to outermost drape when furniture is placed nearby. A sofa back should sit at least 6″ from the wall to avoid crushing fabrics when drapes are drawn.
Minimalist and Frameless Approaches
Not every large window needs dressing. If the view is the star and privacy isn’t a concern, think rural properties, upper floors with no neighboring sightlines, or modern design trends that emphasize clean lines, leave the glass bare or use barely-there treatments.
Frameless options:
• No treatment at all: Works if the window has factory-tinted or low-E glass that manages glare and UV. Add interior plantation shutters only if you need seasonal light control: otherwise, let the architecture speak.
• Recessed roller shades: Mount motorized shades in a pocket or valance above the window so they disappear when raised. This keeps the window surround clean and maintains sightlines. Expect to budget $400–$800 per large window for motorized, pocketed installations.
• Frosted or textured window film: Applied directly to the glass, films diffuse light and obscure views without hardware. They’re semi-permanent (removable with heat and solvent) and cost $2–$6 per square foot in materials. A 60″ × 80″ window runs $65–$130 in film. Application requires a squeegee, spray bottle with soapy water, and patience, air bubbles are the enemy. Pro tip: Work in temperatures above 50°F: film adhesive won’t activate properly in the cold.
• Shoji-style panels: Sliding wood frames with translucent rice paper or acrylic inserts. These work best for contemporary or Japanese-inspired interiors and double as room dividers. Panels are typically 24″–36″ wide: larger windows need multiple tracks. DIY kits run $200–$500 for materials: expect to cut rails to length and assemble frames with wood glue and dowels.
Minimalist approaches require confidence that your window itself is a finished design element, clean mullions, quality trim, and no gaps or drafts that draw the eye.
Creating Privacy Without Sacrificing Light
Large windows facing streets, neighboring homes, or sidewalks need privacy solutions that don’t turn the room into a cave. The goal is to obscure sightlines into the room while still allowing daylight penetration.
Top-down/bottom-up shades: Cellular or Roman shades that lower from the top or raise from the bottom. Lower the top half 18″–24″ to block eye-level views from outside while leaving the upper window open for natural light. This works especially well for living room window ideas where the ceiling is 9′ or higher, you maintain brightness without feeling exposed.
Frosted lower panes: If you’re replacing windows or adding new ones, specify frosted or obscure glass for the bottom 36″–48″ of each unit, leaving clear glass above. It’s a permanent solution that requires no maintenance and preserves upper sightlines. Obscure glass options include rain, reed, and seeded patterns: all diffuse views while transmitting 70%–90% of light.
Exterior solutions: Pergolas, awnings, or strategically planted trees and shrubs on the property create privacy without touching the window itself. A pergola with 2×6 or 2×8 rafters spaced 12″–16″ apart filters harsh afternoon sun while obscuring sightlines from above (neighboring second-story windows). Planting evergreen shrubs 4’–6′ tall along the window line adds year-round screening: allow 3’–4′ between plants and the foundation for air circulation and maintenance access.
Switchable smart glass: Electrochromic or polymer-dispersed liquid crystal (PDLC) glass switches from clear to frosted with a button press or smartphone app. It’s pricey, $50–$100 per square foot installed, but eliminates the need for blinds or curtains entirely. Retrofit film versions exist for $25–$40 per square foot, applied to existing glass. This is a emerging window design option gaining traction in 2026 for tech-forward homes.
Enhancing Views With Strategic Furniture Placement
A great view is wasted if your seating faces the opposite direction. Orient your main sofa or sectional to face the window, or at least angle chairs to capture the sightline without blocking pathways.
Distance from glass: Keep upholstered furniture 12″–18″ from the window to allow for drape stacking and airflow. In cold climates, that gap also prevents cold drafts from the glass from settling onto the sofa back during winter. If space is tight, a narrow console table (10″–14″ deep) behind the sofa creates separation while adding surface area for lamps or decor.
Low-profile pieces: Coffee tables and side tables with slim frames or glass tops preserve the visual line to the window. A chunky, solid wood coffee table anchors the seating area but can compete with the window for attention. Clear acrylic or tempered glass tops feel lighter and keep the focus outward.
Avoid tall bookcases or storage units flanking the window unless the wall space demands it. Vertical elements draw the eye away from the view. If you need storage, use low credenzas (24″–30″ tall) along adjacent walls, which anchor the room without blocking sightlines. Many homeowners find that balancing the fireplace decor with window treatments creates a cohesive focal point in the living room.
Lighting placement: Supplement natural light with floor lamps behind seating or recessed cans on dimmer switches. Avoid placing table lamps directly in front of the window where they’ll create silhouettes and glare at night. Task lighting should frame the window, not compete with it.
Conclusion
Large living room windows are an asset when treated thoughtfully. Whether you opt for floor-length drapes, layered shades, or a minimalist no-treatment approach, the key is matching the solution to your specific needs, light control, privacy, energy performance, and view preservation. Take measurements carefully, invest in proper hardware, and don’t skip the details like low-E glass or UV protection. The result is a living room that feels open, functional, and designed around one of its best features.