Table of Contents
ToggleHard water is a nuisance that most homeowners face without realizing it. Those white spots on glassware, the stubborn film on shower doors, and the way soap never quite lathers properly, all signs that minerals are wreaking havoc on a home’s plumbing and daily life. A water softener eliminates these issues by removing calcium and magnesium from the water supply, but choosing the right system can feel overwhelming. Home Depot offers a wide selection of water softener systems, from compact units for apartments to whole-house models for large families. This guide walks through everything a homeowner needs to know, from selecting the right capacity to tackling installation and ongoing maintenance.
Key Takeaways
- A Home Depot water softener removes calcium and magnesium minerals, preventing costly damage to plumbing, appliances, and extending water heater lifespan by improving efficiency by up to 30%.
- Proper sizing requires multiplying daily water usage by water hardness in grains per gallon, then multiplying by regeneration cycle days—a 40,000-grain unit typically works for households up to five people with moderate hardness.
- Salt-based softeners from Home Depot brands like Rheem, GE, and Whirlpool provide genuine water softening through ion exchange, while salt-free conditioners only prevent scale buildup without improving lathering or soap performance.
- DIY installation of a Home Depot water softener is manageable in 3–4 hours for homeowners with basic plumbing skills, but galvanized pipes, tankless water heaters, or local permit requirements may require professional help.
- Regular maintenance—including monthly salt checks, annual resin bed cleaning, and venturi valve inspection—keeps your system efficient and extends its lifespan.
- Most homeowners recoup their water softener investment within 2–4 years through lower energy bills, reduced detergent consumption, and decreased appliance repairs.
Why You Need a Water Softener for Your Home
Hard water isn’t just annoying, it costs money. Mineral buildup reduces water heater efficiency by up to 30%, forcing the appliance to work harder and shortening its lifespan. Scale accumulates inside pipes, gradually restricting flow and leading to costly plumbing repairs. Appliances like dishwashers and washing machines also suffer, with manufacturers often voiding warranties if hard water damage is evident.
Beyond the plumbing system, hard water affects daily routines. Skin feels dry and itchy after showers because soap residue doesn’t rinse off completely. Hair becomes dull and brittle. Laundry feels stiff, and bright colors fade faster. Professional cleaning services often recommend water softeners as the first line of defense against stubborn mineral deposits.
Testing water hardness is straightforward. Home Depot sells test kits for around $10, or local water utilities provide annual reports. Water measuring above 7 grains per gallon (gpg) is considered hard, with 10+ gpg qualifying as very hard. Most municipal water in the Southwest and Midwest exceeds 10 gpg, making softeners nearly essential in those regions.
A water softener system from Home Depot pays for itself within a few years. Lower energy bills, reduced detergent use (softened water requires half the soap), and fewer appliance repairs add up quickly. For homes on well water, softeners also protect against iron staining, which can permanently discolor fixtures and clothing.
Top Water Softener Options Available at Home Depot
Home Depot stocks several reputable brands, each with distinct features. Rheem, GE, and Whirlpool dominate the water softener aisle, offering models ranging from basic salt-based units to high-efficiency systems with Wi-Fi connectivity.
Rheem’s Preferred series is a solid mid-range choice, available in 32,000-grain to 64,000-grain capacities. These models use demand-initiated regeneration, which means they only recharge when necessary rather than on a fixed schedule. That saves salt and water compared to older timer-based systems.
GE’s GXSH40V is popular for smaller households, with a 40,000-grain capacity and a compact footprint. It includes a self-cleaning sediment filter, which is handy for homes with sandy well water or older municipal lines.
Whirlpool’s WHES40E offers smart features like a touchscreen display and leak detection. It’s slightly pricier but worth considering if the homeowner wants remote monitoring via smartphone.
For budget-conscious buyers, Home Depot’s in-house HDX brand provides basic functionality at a lower price point. These units lack advanced features but handle standard hard water effectively.
Salt-Based vs. Salt-Free Water Softeners
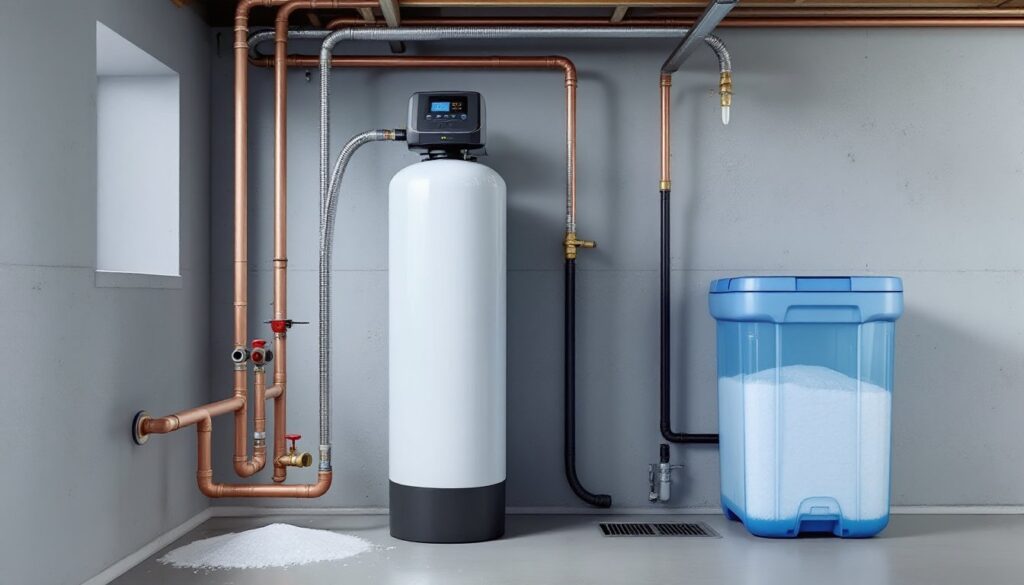
Salt-based softeners are the traditional workhorses. They use ion exchange to replace calcium and magnesium with sodium, genuinely removing hardness minerals. Regeneration cycles flush accumulated minerals into the drain, requiring a connection to a floor drain or sump. These systems need regular salt refills, typically one 40-pound bag every month or two, depending on water usage and hardness.
Salt-free conditioners don’t actually soften water. Instead, they use template-assisted crystallization (TAC) to alter mineral structure so scale doesn’t adhere to surfaces. They won’t prevent soap scum or improve lathering, but they do protect plumbing without requiring salt, electricity, or drain connections. Home Depot markets these as “water conditioners” rather than softeners, which is accurate.
For true softening, the kind that makes skin feel slippery and soap foam up, salt-based is the only option. Salt-free works as a maintenance-free alternative for scale prevention in areas with moderately hard water, but it’s not suitable for severe hardness or situations where soft water is genuinely needed.
How to Choose the Right Water Softener Size and Capacity
Sizing a water softener isn’t guesswork, it’s math. The formula is simple: multiply daily water usage (in gallons) by water hardness (in grains per gallon) to get grains of hardness removed per day. Then multiply by the number of days between regenerations (typically 7–10 days for convenience).
For example, a family of four uses about 300 gallons per day. If water hardness is 12 gpg, that’s 3,600 grains per day. Over a 7-day cycle, the softener needs to handle 25,200 grains, meaning a 32,000-grain capacity would be adequate with some buffer.
Most homeowners oversize slightly to avoid frequent regenerations. A 40,000-grain unit works for households up to five people with moderate hardness. Very hard water (15+ gpg) or large families (six or more) should consider a 48,000- to 64,000-grain model.
Physical space also matters. Measure the installation area carefully, accounting for clearance around the unit. Dual-tank softeners are wider but allow continuous soft water even during regeneration, which is useful for households with high nighttime water use.
Flow rate is another consideration. Standard softeners handle 10–12 gallons per minute (gpm), sufficient for most homes. Larger homes with multiple bathrooms running simultaneously may need a high-flow model rated for 15+ gpm. Home Depot’s product specs list flow rates clearly, don’t skip this detail.
Some water softener systems at Home Depot include a built-in bypass valve, which is essential. During regeneration or maintenance, the bypass allows hard water to flow while the softener is offline. If the model doesn’t include one, purchase it separately, it’s cheap insurance against being without water.
DIY Installation: Can You Install a Home Depot Water Softener Yourself?
Installing a water softener is a manageable project for homeowners comfortable with basic plumbing. It typically takes 3–4 hours, assuming the main water line is accessible and there’s a nearby floor drain.
Tools needed:
- Pipe cutter or hacksaw
- Adjustable wrenches
- Teflon tape
- Measuring tape
- Level
- Bucket and towels
- Soldering torch (if working with copper) or PEX crimping tool
Materials:
- Softener unit
- Bypass valve (if not included)
- Compression fittings or SharkBite connectors
- Drain line tubing
- Brine tank overflow kit
Start by shutting off the main water supply and draining the lines. Locate the point where the main enters the house, before it splits to the water heater. The softener must be installed on the cold supply line only, never soften water going to the heater, as it’s unnecessary and wastes salt.
Cut the cold line and install the bypass valve according to the manufacturer’s instructions. Most Home Depot water softener systems use 1-inch NPT threads, so double-check measurements. Compression fittings simplify the job for copper or PEX: SharkBite connectors are even easier but cost more.
Position the softener near a floor drain for the discharge line. Regulations vary, but most codes require an air gap to prevent backflow, don’t connect the drain line directly to a sewer pipe. The brine tank needs a nearby electrical outlet (standard 120V) unless it’s a non-electric model.
Many DIY enthusiasts find that the trickiest part is ensuring the drain line slopes continuously downward to prevent standing water. Use 1/2-inch tubing and secure it every few feet.
When to call a pro: If the home has galvanized steel pipes, a professional should handle the installation. Cutting into old galvanized lines often reveals internal corrosion, turning a simple job into a full repipe. Similarly, if local code requires a licensed plumber for backflow prevention or the water heater is tank-less (which complicates loop configurations), hire help. Check local permit requirements, some jurisdictions require permits for any plumbing work, though many exemptions exist for like-for-like replacements.
Maintenance Tips to Keep Your Water Softener Running Efficiently
Water softeners are low-maintenance, but neglect leads to problems. The most important task is keeping the brine tank filled with salt. Use solar salt pellets or potassium chloride (a sodium-free alternative). Avoid rock salt, it contains impurities that gunk up the resin bed.
Check salt levels monthly. The tank should be at least one-third full, with salt always above the water line. If water rises above the salt, a “salt bridge” may have formed, a hardened crust that prevents brine from forming. Break it up with a broom handle.
Every six months, inspect the brine tank for salt mushing, a sludgy layer at the bottom that blocks water flow. If present, empty the tank, scrape out the residue, and refill with fresh salt. This is messy but necessary.
Resin bed cleaning extends system life. Once a year, pour a resin cleaner (available at Home Depot for about $10) into the brine tank and manually initiate a regeneration cycle. This flushes iron, sediment, and organic matter that gradual accumulates and reduces efficiency.
Clean the venturi valve and screen annually. This small component, usually accessed via a screw cap on the control head, meters water flow during regeneration. A clogged venturi prevents proper backwashing. Remove it, rinse under warm water, and use a toothpick to clear any debris from the tiny orifice. Wear safety glasses, spring-loaded parts can pop out.
Monitor regeneration frequency. If the softener regenerates more than twice per week, either hardness settings are incorrect or there’s a leak in the system. Adjust settings per the manual, or contact a local professional for diagnostics.
Bypass valve exercise: Once a month, flip the bypass valve back and forth a few times to prevent it from seizing. Valves left in one position for years can become stuck, which is a problem during emergencies or maintenance.
Cost Breakdown: What to Expect When Buying from Home Depot
Water softener pricing at Home Depot varies widely based on capacity and features. Budget models start around $400 for a basic 32,000-grain unit. Mid-range systems with demand-initiated regeneration and digital controls run $600–$900. High-end models with Wi-Fi, leak detection, and dual tanks can exceed $1,500.
Installation costs (if hiring a pro) typically range from $200 to $500, depending on complexity. Straightforward installations with accessible plumbing and nearby drains fall on the lower end. Adding a loop, relocating electrical outlets, or working with difficult pipe materials increases labor costs. Always get multiple quotes, pricing varies significantly by region and contractor.
Ongoing expenses include salt ($5–$8 per 40-pound bag), water for regeneration (typically 50–100 gallons per cycle), and electricity (about $5–$10 per year). A household using one bag of salt per month spends roughly $60–$100 annually.
Home Depot frequently runs promotions on water softener systems, especially during spring and summer when demand peaks. Sign up for email alerts or check the website weekly. Installation packages bundled with softener purchases sometimes offer discounted labor.
Extended warranties are available but read the fine print. Standard manufacturer warranties cover parts for 1–5 years. Extended plans (around $100–$200) add coverage but often exclude labor and consequential damage. Evaluate whether the extra cost justifies peace of mind based on the home’s age and plumbing condition.
Rental programs exist but aren’t widely promoted at Home Depot. Some local water treatment companies offer monthly rental (around $30–$50/month) with included maintenance. This makes sense for renters or homeowners unsure about long-term commitment, but over five years, purchasing outright is more economical.
Factor in payback period. Between reduced energy bills, lower detergent use, and extended appliance life, most homeowners recoup their investment within 2–4 years. Homes with very hard water or expensive well-water treatment systems see faster returns.