Table of Contents
ToggleA cramped bathroom doesn’t have to feel like a compromise. In spaces measuring 5×8 feet or smaller, the arrangement of fixtures, not just the décor, determines whether the room functions smoothly or becomes a daily frustration. Strategic layout planning transforms tight quarters into efficient, comfortable spaces without requiring a full gut renovation. The difference between a bathroom that feels claustrophobic and one that works seamlessly often comes down to a few inches of clearance, smart fixture selection, and understanding how people actually move through the space. With material costs and labor rates climbing, getting the layout right the first time matters more than ever.
Key Takeaways
- Strategic small bathroom layout planning prioritizes fixture placement and code-required clearances over décor, preventing daily frustration and costly renovations in spaces under 5×8 feet.
- The three-quarter layout (toilet, sink, shower stall without tub) maximizes functionality in compact spaces by freeing 12-15 square feet and reducing plumbing costs through single-wall grouping.
- Space-saving fixtures—such as round-front toilets (25-28 inches), wall-hung vanities (16-18 inches deep), and corner sinks—enable code-compliant arrangements in tight quarters without sacrificing storage or comfort.
- Visual expansion techniques including large-format tiles, frameless glass enclosures, layered lighting with dimmers, and full-wall mirrors make small bathrooms feel significantly larger without structural changes.
- Common avoidable mistakes include ignoring door swing paths, skipping full-scale mockups, undersizing ventilation fans, and attempting plumbing or structural work without proper permits and professional expertise.
Why Smart Layout Planning Matters in Small Bathrooms
Building codes set minimum clearances for a reason. The International Residential Code (IRC) requires at least 21 inches of space in front of toilets, sinks, and tubs, with 15 inches of clearance to each side of a toilet centerline. In a 5×7-foot bathroom, those measurements consume nearly every available inch, leaving little room for error.
Poor planning leads to bruised hips from protruding vanity corners, doors that can’t fully open, or toilets positioned so close to tubs that using either becomes awkward. Compact bathroom design isn’t about cramming standard fixtures into undersized rooms: it’s about selecting proportional elements and positioning them to preserve functional clearances.
A well-planned small bathroom layout also protects resale value. Home inspectors flag code violations, and buyers notice when fixtures feel squeezed or awkwardly placed. Spending time on layout prevents costly do-overs and ensures the space meets both legal requirements and daily usability standards. Measure twice, cut once applies to floor plans just as much as trim carpentry.
Essential Layout Configurations for Compact Spaces
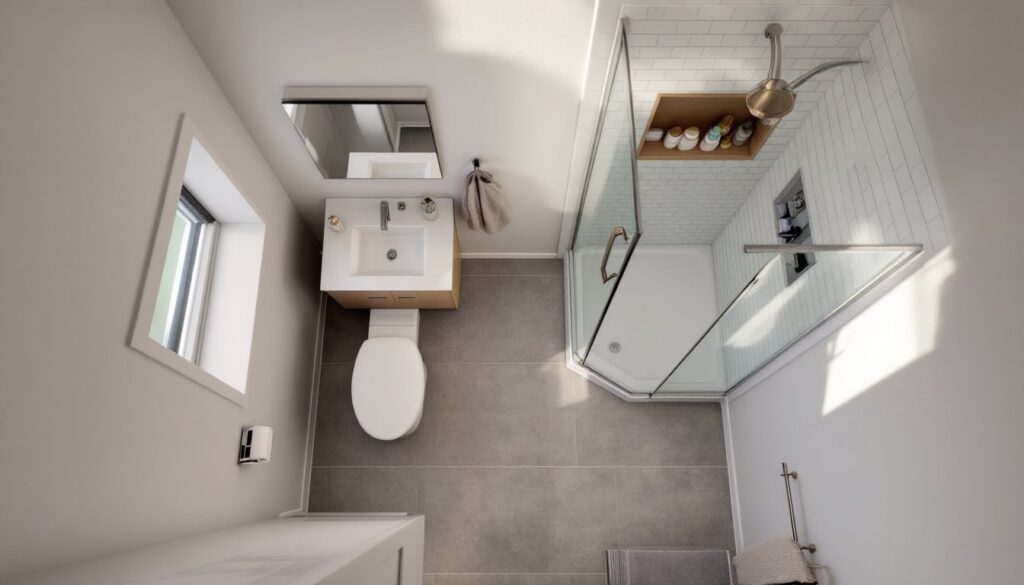
The Three-Quarter Layout
The three-quarter configuration, toilet, sink, and shower stall (no tub), remains the most practical option for small bathroom design. Eliminating the tub frees 12-15 square feet, enough to upgrade from a 32-inch vanity to a 36-inch model or add a linen closet.
In long narrow bathroom design scenarios (typically 5 feet wide by 10+ feet long), position the toilet at the far end, the shower against one long wall, and the vanity near the entry. This arrangement keeps plumbing grouped on one wall (reducing rough-in costs) while maintaining code-required clearances. Corner showers work well in tighter footprints: a neo-angle unit (the ones with angled glass doors) takes up less visual and physical space than square models.
For narrow bathroom design layouts under 40 square feet, swing the door outward or use a pocket door. A standard 32-inch inswing door eats roughly 8 square feet of floor space when opened, space better used for movement or storage.
The Wet Room Approach
Wet rooms eliminate shower enclosures entirely, treating the entire bathroom as a waterproof zone with a floor drain. This design small bathroom strategy works exceptionally well in spaces with awkward dimensions where a traditional shower stall won’t fit.
Installation requires a sloped mortar bed (minimum 1/4-inch drop per foot) and a waterproofing membrane rated for continuous wet exposure, think Schluter KERDI or RedGard. The toilet and vanity sit on the same waterproofed floor. A glass half-panel or simple curtain contains spray without boxing in the space.
Wet rooms aren’t trivial DIY projects. The waterproofing must be flawless: even small gaps lead to subfloor rot and mold. Unless you’ve done commercial tile work or shower pan installations before, hire a licensed contractor for the membrane and drain installation. You can handle the tile setting if you’re comfortable with thinset and grout, but the substrate work needs to be bulletproof. Permits are typically required for wet room conversions since they involve plumbing alterations and structural waterproofing.
Space-Saving Fixtures and Placement Strategies
Standard fixtures weren’t designed for tight quarters. A typical vanity measures 21 inches deep: narrow versions at 16-18 inches provide nearly identical storage while reclaiming 3-5 inches of floor space. Wall-hung vanities expose floor area underneath, making the room feel larger and simplifying cleaning.
Corner sinks remain underutilized. Pedestal models or compact wall-mount units fit into spaces as small as 24×24 inches, dead zones that can’t accommodate standard fixtures. Corner bath sinks designed for tight layouts maintain functionality without sacrificing clearances.
Toilet selection matters more than most people realize. Compact or “round-front” bowls measure 25-28 inches from wall to front edge, compared to 29-31 inches for elongated models. That 3-4 inch difference often determines whether a layout meets code clearances. Wall-hung toilets (with in-wall tanks) save 6-9 inches of depth but require opening the wall to install the carrier frame, not a simple swap.
For small luxury bathroom ideas, consider a narrow master bathroom layout with a 48-inch tub instead of the standard 60-inch model. Shorter soaking tubs (some as compact as 54 inches) fit long skinny bathroom layout scenarios where a full-size tub blocks traffic flow. Pair with a handheld shower fixture on a slide bar to maintain bathing flexibility.
Plumbing placement drives costs. Every fixture more than 5 feet from the main drain stack requires additional venting and larger-diameter drainpipes. Group fixtures along a single wet wall whenever possible. If you’re roughing in new supply lines, use PEX rather than copper, it’s more forgiving in tight spaces and doesn’t require sweating joints in cramped quarters.
Design Tricks to Make Your Small Bathroom Feel Larger
Perception matters as much as actual square footage. Small luxury modern bathroom aesthetics rely on visual continuity: large-format tiles (12×24 inches or bigger) reduce grout lines and make floors feel more expansive. Run tile in the long direction of narrow master bathroom layout spaces to emphasize length.
Glass shower enclosures, fully frameless if budget allows, eliminate visual barriers that make spaces feel chopped up. Frosted or textured glass provides privacy without the visual weight of opaque materials. Avoid shower curtains in design small bathroom ideas when possible: they billow, collect mildew, and create a claustrophobic vibe.
Lighting layering changes everything. A single overhead fixture creates harsh shadows and dead zones. Add recessed cans (IC-rated if you have insulation above), sconces flanking the mirror, and LED strip lighting under a floating vanity. Dimmer switches let users adjust intensity, critical for early mornings versus evening baths.
Mirrors amplify both light and space. A full-wall mirror behind the vanity doubles the perceived depth of the room. Avoid heavily framed mirrors in tight spaces: frameless or thin-profile versions feel less cluttered. Medicine cabinets with mirrored fronts provide storage without sacrificing reflective surface.
Many interior design resources showcase vertical storage strategies: recessed niches in shower walls (framed between studs during construction), tall narrow cabinets, and open shelving above the toilet. Just keep weight limits in mind, drywall anchors rated for 50 pounds work for towels, not for stacks of tile or heavy décor.
Color psychology applies here. Light neutrals expand space visually, but all-white can feel sterile. Introduce texture through matte tiles, natural wood accents, or stone-look porcelain. Dark accent walls work if balanced with ample lighting and reflective surfaces, test samples in your actual space before committing to full coverage.
Common Small Bathroom Layout Mistakes to Avoid
Ignoring door swing. Measure the door arc on your floor plan. If it hits the toilet or vanity, you’ve got a problem. Pocket doors solve this but require opening the wall to install a carrier track, figure on half a day’s work and around $200-300 in materials for a basic kit.
Skipping a full-scale mockup. Before demoing anything, use painter’s tape on the floor to outline fixture footprints at actual dimensions. Walk through the space. Can you comfortably stand in front of the sink? Does the toilet feel boxed in? Cardboard mockups cost nothing and catch issues that don’t show up on graph paper.
Undersizing ventilation. Small bathrooms trap moisture fast. The IRC requires exhaust fans rated for the room’s cubic footage: multiply length × width × height, then choose a fan rated for at least that CFM (cubic feet per minute). A 5×8-foot bathroom with an 8-foot ceiling needs a minimum 320 CFM fan. Undersized fans lead to mold, peeling paint, and moisture damage. Look for Energy Star-rated models, they’re quieter and more efficient.
Choosing style over function. That farmhouse pedestal sink looks great on design platforms, but offers zero storage. In a small bathroom, every fixture needs to earn its keep. Wall-mounted vanities with drawers, mirrored medicine cabinets, and shower niches keep clutter off surfaces without eating floor space.
Forgetting about access panels. If your layout puts a tub or vanity against the wall hiding shutoff valves or the main drain cleanout, install an access panel before closing up walls. Future you (or a plumber) will appreciate it when a repair is needed. Standard panels cost $15-30 and take minutes to install.
DIY-ing structural changes without permits. Moving drains or supply lines almost always requires a plumbing permit. Altering walls that might be load-bearing needs an engineer’s sign-off. Permit costs ($100-500 depending on locality) are trivial compared to the expense of ripping out unpermitted work during a future sale or dealing with insurance denials if something fails.
For comprehensive inspiration on finishes and fixtures that work in tight spaces, explore bathroom decor design approaches that balance aesthetics with practicality. Long narrow bathroom layout ideas especially benefit from cohesive color schemes and streamlined materials that don’t compete for visual attention.
Final thought: Small bathroom layout ideas succeed when they prioritize human movement and daily routines over Pinterest aesthetics. Measure carefully, respect code clearances, and choose fixtures scaled to the space. The best compact bathroom design feels effortless to use, and that only happens when the planning work happens upfront, before the first wall comes down.